________________________________________________________________________________
John Deere 3120, 3320, 3520, 3720 - Service Engine
John Deere 3120, 3320, 3520, 3720 Engine Oil
Choose oil viscosity based on the expected air temperature
range during the period between oil changes. John Deere PLUS-50 oil is
recommended. TORQ-GARD SUPREME and oils meeting ACEA Specification E4/E5
may also be used. Other oils may be used if they meet one or more of the
following: API Service Classification CI-4, API Service Classification
CH-4, or ACEA Specification E3. Multi-viscosity diesel engine oils are
preferred. Do not use break-in oils. Checking Engine Speeds - Check
engine speeds when engine is warmed up and not under load. Observe tachometer.
Checking Engine Oil Level
Failure to check the oil level regularly
could lead to serious engine problems if oil level is low: Check oil
level before operating. Check oil level when the JD 3120, 3320, 3520,
3720 engine is cold and not running. Keep level between the Full and the
Add marks. Shut off engine before adding oil. Check engine oil when
engine is cold. If engine is warm, allow to cool for at least five
minutes before checking oil. Park the machine safely. Dirt and
contamination can enter engine when checking oil level. Clean area
around dipstick before loosening or removing. Remove dipstick. Wipe
with a clean cloth. Install dipstick. Remove dipstick. Check oil level
on dipstick. Oil level should be between levels on dipstick.
If oil level is low: Remove oil fill cap. Add proper engine oil
until oil level is within operating range on dipstick. Do not overfill.
Install oil fill cap. If oil is above level on the dipstick,
drain to proper level. Install dipstick.
John Deere 3120, 3320, 3520, 3720 Tractors - Changing Engine Oil and Filter

Run John Deere 3120, 3320, 3520 engine
to warm the oil. Park machine safely. Place drain pan under oil drain
located on left side of engine. Remove drain plug. Remove two drain
plugs on model JD 3720. Wipe dirt from around oil filter. Turn filter
counter-clockwise to remove. Put a light coat of clean engine oil on the
gasket of new filter. Install replacement oil filter by turning filter
clockwise until gasket contacts filter base. Tighten additional one-half
turn. Install drain plug. Do not overtighten. Install two drain plugs on
model JD 3720. Remove oil fill cap. Add recommended engine oil. Install
oil fill cap. Start and run engine at idle to check for leaks. Stop
engine. Fix any leaks before operating. Check engine oil level and add
oil if necessary.
Cleaning Rubber Dust Unloading Valve
Do not operate engine without air
cleaner element and rubber dust unloading valve installed. Park the
vehicle safely. Allow engine to cool. Access the engine compartment.
Squeeze dust unloading valve to clean. Remove and replace if
damaged. Servicing Air Filter Element - Dirt and debris can enter the
engine when removing the filter element. Service filter elements only
when red signal is in view in the instrument panel. Shut off engine and
turn off all lights before service.
John Deere 3120, 3320, 3520, 3720 Tractor - Servicing Primary Element
Park John Deere 3120, 3320, 3520, 3720 tractor. Allow engine to
cool. Check to be sure key switch and all lights are off. If the key
switch or any lights are left on, the air restriction indicator light
may continue to flash even after the filter has been replaced. Raise
hood. Release latches and remove air cleaner canister cover.
Remove and discard primary element. Clean out any dirt in canister,
taking care not to damage the secondary filter element. Replace with a
new primary filter element. Install air cleaner canister cover with
rubber dust unloading valve pointing downward. Check instruction
molded into canister cover for proper installation. Hook latches onto cover. Lower hood.
Servicing Secondary Element
Secondary element does not need routine
replacement. Visually inspect it without removing from canister. Do not
attempt to clean secondary element. If secondary element is replaced,
install new primary and secondary element immediately to prevent dust
from entering air intake system. Remove air cleaner canister cover.
Remove and discard primary air filter element. Remove and discard
secondary air filter element. Replace with a new secondary air
filter element. Install new primary air filter element. Replace air
cleaner canister cover. Lower hood. Checking Air Filter Hose - Park
machine safely. Raise hood. Upper air intake flange must be properly
installed into shroud adapter on radiator support frame. Locate
lower air intake hose below muffler, and tighten hose clamps.
Lower hood.
Checking Air Restriction Indicator Light
JD 3120, 3320, 3520, 3720 Tractor Engine exhaust fumes contain carbon monoxide. Do not run an engine in an enclosed area without adequate ventilation. Be cautious and wear protective clothing when servicing or working near a hot engine and components. Keep hands, clothing, jewelry and long hair away from moving parts. Park the machine safely. Start the engine. Raise hood. Block the air intake hose with cardboard or other solid material. Do not block with a cloth or any other material which would allow air to flow. Increase throttle to full engine rpm. The air restriction indicator light on the instrument panel should illuminate. Turn off all light switches and stop the engine. The air restriction indicator light should go out. Remove block to air intake hose and lower the hood.
John Deere 3120, 3320, 3520, 3720 Cooling System
Checking Coolant Level
Using incorrect coolant mixture can damage the
radiator: Do not operate engine with plain water. Do not exceed a 50%
mixture of coolant and water. Aluminum engine blocks and radiators
require approved ethylene-glycol based antifreeze. If you suspect a
leak, check the coolant level by removing the radiator cap and looking
inside. Park the vehicle safely. Allow engine to cool. Raise hood. Check
recovery tank coolant level: If engine is warm, coolant level should
be between the FULL HOT line and the FULL COLD line. If engine
is cold, coolant level should be at the FULL COLD line on the
recovery tank. Remove recovery tank cap if necessary to add coolant.
Add pre-diluted coolant or specified ratio of antifreeze and water.
Install recovery tank cap. Lower hood.
John Deere 3120, 3320, 3520, 3720 Tractor Cooling System Service
Park machine safely. Allow engine to cool.
Raise hood. Slowly open radiator cap to the first stop to release
all pressure. Close radiator cap tightly. Position drain pan under
radiator petcock on left side of machine. Open petcock and drain
coolant. Disconnect coolant hose at connection to oil filter
base, and allow all coolant to drain into pan. After coolant drains from
the recovery tank, remove radiator cap. Close radiator petcock and
connect coolant hose. Flush cooling system. Flushing Cooling System -
Fill cooling system with clean water and John Deere Cooling System
Cleaner, or Cooling System Quick Flush or an equivalent. Follow
directions on container. Install and tighten radiator cap. Start and run
engine until it reaches operating temperature. Stop engine. Open
radiator petcock and disconnect coolant hose. Drain cooling system
immediately before rust and dirt settle. Close radiator petcock and
connect coolant hose.
John Deere 3120, 3320, 3520, 3720 Cooling System Filling
Using incorrect coolant mixture can damage the radiator: Do not operate engine with plain water. Do not exceed a 50% mixture of coolant and water. Aluminum engine blocks and radiators require approved ethylene-glycol based antifreeze. John Deere COOL-GARD coolant is recommended when adding new coolant to the cooling system. Follow the directions on the container for correct mixture ratio. Allow radiator to cool. Fill cooling system with recommended coolant. Install and tighten radiator cap. Run engine until it reaches operating temperature. Stop JD 3120, 3320, 3520, 3720 engine. Allow engine to cool. Some coolant may be drawn into the radiator from the recovery tank during cool down. Raise hood. Check recovery tank coolant level: After engine cools, coolant level should be at the FULL COLD line on the recovery tank. Remove cap rom recovery tank to add coolant if necessary. Lower hood.
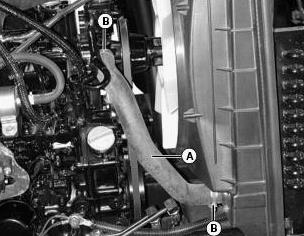
Checking Radiator Hoses - Allow engine to cool. Raise hood. Check lower
radiator hose for damage or cracking. Replace if necessary. Tighten
hose clamps as needed. Check upper radiator hose for damage or
cracking. Replace if necessary. Tighten hose clamps as needed. Lower
hood.
Cleaning Radiator Screen and Fins
Raise hood. Lift and remove radiator screen off of clips on top of radiator. Clean screen with compressed air, brush or cloth, or screen may be carefully washed to remove dirt and debris. Reduced air intake can cause overheating. Keep radiator cooling fins clean. Do not use pressure washers to clean radiator cooling fins. The force produced by pressure washers will damage the radiator and cooling fins. Reduce compressed air pressure to 210 kPa (30 psi) when cleaning radiator and cooling fins. Spray compressed air straight into radiator. Do not spray radiator on an angle or cooling fins will be bent. Remove all dirt and debris from radiator fins, and fan shroud using compressed air or water. Install radiator screen. Lower hood.
John Deere 3120, 3320, 3520, 3720 - Servicing Belt
Adjusting Compressor Belt Tension
Raise hood. Apply moderate thumb
pressure to belt halfway between the pulleys. Belt should deflect
inward approximately 9 mm (3/8 in). Adjust belt tension if deflection is
more or less than specified. Loosen nut on tensioner sheave.
Slide tensioner downward for more tension on belt or upward for less
tension on belt. Tighten nut on tensioner sheave and check belt tension.
Adjust as necessary. Lower hood. Replacing Belt - Raise hood. Disconnect
black negative (-) cable from battery. Loosen nut on tensioner
sheave. Slide tensioner upward to remove tension on belt, and remove
belt from compressor sheave, engine sheave, and tensioner sheave.
Install new belt over engine sheave and then onto remaining sheaves.
Apply pressure to tensioner sheave until tension is correct and
tighten nut. Check belt tension, and adjust as necessary. Connect
black negative (-) cable to battery. Lower hood.
Servicing the Alternator Belt
Allow John Deere 3120, 3320, 3520, 3720
engine to cool. Raise hood. Apply moderate thumb pressure to belt
halfway between the pulleys. Belt should deflect inward approximately 9
mm (3/8 in.). Adjust belt tension if deflection is more or less than
specified. Loosen top adjusting bolt: For tractors without a cab, loosen
top adjusting bolt. For tractors with a cab, loosen top adjusting
bolt and nut. Loosen mounting bolt. Apply outward pressure to
alternator housing until tension is correct. Tighten bolts.
Check belt tension. Lower hood.
Servicing Water Separator Sediment Bowl
Allow engine to cool. Red ring
in bottom of sediment bowl will float on water. If ring is floating,
sediment bowl should be cleaned. Check for water and deposits in
sediment bowl. Clean sediment bowl and replace fuel filter if
necessary. Cleaning Water Separator Sediment Bowl - Close fuel shut-off
valve. Position drain pan under sediment bowl to catch fuel
spillage. Turn locking collar counterclockwise to remove bowl.
Remove and retain the plastic ring and spring from sediment bowl. Clean
bowl, plastic ring, and spring. Install plastic ring and spring in
original position in sediment bowl. Place sediment bowl and locking
collar in position. Tighten locking collar to filter head to secure.
Open fuel shut-off valve. Fuel system is self bleeding. Crank engine to
bleed fuel system.
Cleaning Fuel Filter Sediment Bowl and Replacing Filter
Allow John Deere 3120, 3320, 3520 engine to cool. Raise hood. Close fuel shut-off valve. Position drain pan under fuel filter sediment bowl to catch fuel spillage. Turn locking collar counterclockwise to remove bowl. Remove and discard the fuel filter. Remove and retain the plastic ring and spring from sediment bowl. Clean bowl, plastic ring, and spring. Install plastic ring and spring in original position in sediment bowl. Install new filter to filter head. Place sediment bowl and locking collar in position. Tighten locking collar to filter head to secure. Open fuel shut-off valve. Lower hood. Crank engine to bleed fuel system. Replacing Fuel Filter - Allow engine to cool. Close fuel shut-off valve. Position drain pan under fuel filter to catch fuel spillage. Turn filter counterclockwise to remove and discard. Apply fuel to surface of new filter gasket. Install new filter to filter head. Tighten to one complete turn after filter contacts head. Open fuel shut-off valve.
- JD 3120, 3320, 3520, 3720 Engine
- JD 3120, 3320, 3520, 3720 Transmission
- JD 3120, 3320, 3520, 3720 PTO
- JD 3120, 3320, 3520, 3720 Brakes and Wheels
- JD 3120, 3320, 3520, 3720 Hydraulic and Hitch
- JD 3120, 3320, 3520, 3720 Operating
- JD 3120, 3320, 3520, 3720 Troubleshooting
________________________________________________________________________________
________________________________________________________________________________________
 JD SPECS
 JD LOADERS
 JD MAINTENANCE
 JD INSTRUCTIONS
 JD PROBLEMS
________________________________________________________________________________________
 JD 2025R
 JD 3039R
 JD 4044R
 JD 4105
 JD 4720
________________________________________________________________________________________
 420 Loader
 419 Loader
 510 Loader
 512 Loader
 520 Loader
________________________________________________________________________________________
 520M Loader
 540M NSL
 540 Loader
 440R Loader
 H180 Loader
________________________________________________________________________________________
________________________________________________________________________________________
 JD 5045E
 JD 5085E
 JD 5100M
 JD 6105R
 JD 6120M
________________________________________________________________________________________
 JD 6155M
 JD 6195R
 JD 6210R
 JD 7210R
 JD 7250R
________________________________________________________________________________________
 JD 7310R
 JD 8245R
 JD 8295R
 JD 8370R
 JD 9370R
________________________________________________________________________________________
 120R Loader
 D120 Loader
 H120 Loader
 45 Loader
 200CX Loader
________________________________________________________________________________________
 D160 Loader
 D170 Loader
 H160 Loader
 H165 Loader
 H240 Loader
________________________________________________________________________________________
 210 Loader
 220R Loader
 300E Loader
 300X Loader
 300CX Loader
________________________________________________________________________________________
 JD 9420R
 JD 9510R
 JD GX335
 JD GX85
 JD LA105
________________________________________________________________________________________
 JD 5065M
 JD 5055D
 JD 5115R
 JD 5105M
 JD 6110R
________________________________________________________________________________________
 JD 6130D
 JD 6225
 JD 7530
 JD 4044M
 JD 7185J
________________________________________________________________________________________
 300 Loader
 300R Loader
 320R Loader
 400E Loader
 410 Loader
________________________________________________________________________________________
 430 Loader
 460 Loader
 521 Loader
 531 Loader
 541 Loader
________________________________________________________________________________________
 551 Loader
 631 Loader
 651 Loader
 661 Loader
 603R Loader
________________________________________________________________________________________
 JD D130
 JD D160
 JD 325
 JD 335
 JD 345
________________________________________________________________________________________
 JD 2520
 JD 3005
 JD 3720
 JD 1025R
 JD 3033R
________________________________________________________________________________________
 JD 5090EL
 JD 5100MH
 JD 5075GV
 JD 6090RC
 JD 6110B
________________________________________________________________________________________
 623R Loader
 643R Loader
 731 Loader
 746 Loader
 751 Loader
________________________________________________________________________________________
 533 Loader
 583 Loader
 633 Loader
 653 Loader
 683 Loader
________________________________________________________________________________________
 H260 Loader
 663R Loader
 663 Loader
 683R Loader
 753 Loader
________________________________________________________________________________________
 JD 6125J
 JD 6150RH
 JD 6210J
 JD 7195J
 JD 8310
________________________________________________________________________________________
 JD 6325
 JD 5525
 JD 5083EN
 JD 5100GN
 JD 5125R
________________________________________________________________________________________
 210C Backhoe
 300D Backhoe
 310G Backhoe
 410G Backhoe
 710G Backhoe
________________________________________________________________________________________
 80 Loader
 100 Loader
 146 Loader
 148 Loader
 158 Loader
________________________________________________________________________________________
 168 Loader
 175 Loader
 522 Loader
 542 Loader
 540R Loader
________________________________________________________________________________________
 562 Loader
 563 Loader
 673 Loader
 741 Loader
________________________________________________________________________________________
 L108 Automatic
 L120 Automatic
 LA110 Automatic
 LA120 Automatic
 LA150 Automatic
________________________________________________________________________________________
 LT155
LT155 LT160 Automatic
 LT180 Automatic
 LTR180
 X165
X165________________________________________________________________________________________
 E100
E100 E120
E120 E150
E150 LTR166
________________________________________________________________________________________
 LA135
LA135 LA165
LA165 LX277
LX277 LX288
LX288 LX255
LX255________________________________________________________________________________________
 S240
S240 GT235
GT235 G110 Automatic
 JD 3203
 JD 5520
________________________________________________________________________________________
 JD 316
 JD 420
 JD 425
 JD 445
________________________________________________________________________________________
 JD_5050D
 X300
X300 X304
X304 X310
X310 X110 Automatic
________________________________________________________________________________________
 H310 Loader
 H340 Loader
 H360 Loader
 H380 Loader
 H480 Loader
________________________________________________________________________________________
 240 Loader
 245 Loader
 260 Loader
 265 Loader
 280 Loader
________________________________________________________________________________________
 600R Loader
 620R Loader
 640R Loader
 660R Loader
 680R Loader
________________________________________________________________________________________
 JD_5039D
 X146R
X146R X360
X360 X155R
X155R X140 Automatic
________________________________________________________________________________________
 X350
X350 X380
X380 X500
X500 X590
X590 X700
X700________________________________________________________________________________________
 3036E
3036E 2038R
2038R 3038R
3038R 4049M
4049M JD 4100
________________________________________________________________________________________
 X738
X738 X740
X740 X748
X748 X749
X749 X950R
X950R________________________________________________________________________________________
 JD 4510
 5045D
5045D 5050E
5050E 5060E
5060E 5078E
5078E