
________________________________________________________________________________
1106 Perkins motor - Cooling System (Inspect and adjust)
1106 Perkins motor has a pressure type cooling system. A pressure type
cooling system gives two advantages: The pressure type cooling system
can operate safely at a higher temperature than the boiling point of
water at range of atmospheric pressures. The pressure type cooling
system prevents cavitation in the water pump.
Cavitation is the sudden generation of low pressure bubbles in liquids
by mechanical forces. The generation of an air or steam pocket is much
more difficult in a pressure type cooling system. Regular inspections of
the cooling system should be made in order to identify problems before
damage can occur. Visually inspect the cooling system before tests are
made with the test equipment.
Visual Inspection Of The Cooling System - Check the coolant level in the
cooling system. Look for leaks in the system. A small amount of coolant
leakage across the surface of the water pump seals is normal. This
leakage is required in order to provide lubrication for this type of
seal. A hole is provided in the water pump housing in order to allow
this coolant/seal lubricant to drain from the pump housing. Intermittent
leakage of small amounts of coolant from this hole is not an indication
of water pump seal failure.
Inspect the radiator for bent fins and other restriction to the flow of
air through the radiator. Inspect the drive belt for the fan. Inspect
the blades of the fan for damage. Look for air or combustion gas in the
cooling system. Inspect the radiator cap for damage. The sealing surface
must be clean. Look for large amounts of dirt in the radiator core. Look
for large amounts of dirt on the engine. Shrouds that are loose or
missing cause poor air flow for cooling.
Engine Oil Cooler Inspect
Low Mounted Filter - Perform the following procedure in order to inspect
the engine oil cooler with the lowmounted filter: Place a container
under the oil cooler in order to collect any engine oil or coolant that
drains from the oil cooler. Removal the engine oil cooler. Thoroughly
clean the oil cooler (1) and the cylinder block.
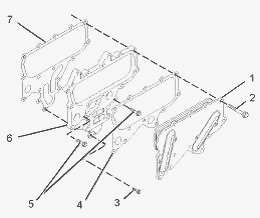
(1) Oil cooler (2) Long setscrew (3) Short setscrew (4) Joint (5)
Setscrews (6) Housing for the oil cooler (7) Joint
Inspect the oil cooler (1) for cracks and dents. Replace the oil cooler
(1) if cracks or dents exist. Ensure that no restrictions for the flow
of lubricating oil exist in the oil cooler (1). Dry the oil cooler (1)
with low pressure air. Flush the inside of the oil cooler (1) with clean
lubricating oil. Install the engine oil cooler. Ensure that the cooling
system of the engine is filled to the correct level. Operate the engine.
Check for oil or coolant leakage.
High Mounted Filter - Perform the following procedure in order to
inspect the engine oil cooler with the low mounted filter: Place a
container under the oil cooler in order to collect any engine oil or
coolant that drains from the oil cooler. Removal the engine oil cooler.
Thoroughly clean the oil cooler (1) and the cylinder block.
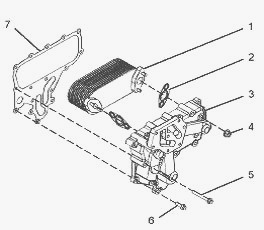
(1) Oil cooler (2) Joint (3) Housing for the oil cooler (4) Nut (5) Long
setscrew (6) Setscrew (7) Joint
Inspect the oil cooler (1) for cracks and dents. Replace the oil cooler
(1) if cracks or dents exist. Ensure that no restrictions for the flow
of lubricating oil exist in the oil cooler (1). Dry the oil cooler (1)
with low pressure air. Flush the inside of the oil cooler (1) with clean
lubricating oil. Install the engine oil cooler. Ensure that the cooling
system of the engine is filled to the correct level. Operate the engine.
Check for oil or coolant leakage.
Water Temperature Regulator - Remove the water temperature regulator
from the 1106 Perkins motor. Heat water in a pan until the temperature
of the water is equal to the fully open temperature of the water
temperature regulator. Stir the water in the pan. This will distribute
the temperature throughout the pan. Hang the water temperature regulator
in the pan of water. The water temperature regulator must be below the
surface of the water. The water temperature regulator must be away from
the sides and the bottom of the pan. Keep the water at the correct
temperature for ten minutes. After ten minutes, remove the water
temperature regulator. Immediately measure the opening of the water
temperature regulator. If the distance is less than the amount listed in
the manual, replace the water temperature regulator.
Water Pump Inspect - Inspect the water pump for leaks at vent hole. The
water pump seal is lubricated by coolant in the cooling system. It is
normal for a small amount of leakage to occur as the engine cools down
and the parts contract. Inspect the water pump shaft for unusual noise,
excessive looseness and/or vibration of the bearings.
Engine And Cooling System Heat Problems - The following conditions
indicate that a heat problem exists. Hot coolant is released through the
pressure cap during the normal operation of the engine. Hot coolant can
also be released when the engine is stopped. Hot coolant is released
from the coolant system but not through the pressure cap during normal
operation of the engine. Hot coolant can also be released when the
engine is stopped. Coolant must be added frequently to the cooling
system. The coolant is not released through the pressure cap or through
an outside leak.
If any of the conditions exist, perform the following procedures: Run
the engine at medium idle, which is approximately 1200 rpm, for three
minutes after the high idle shuts off. Running the engine at medium idle
will allow the engine to cool before the engine is stopped. Inspect the
poly v-belt for wear or for damage. If necessary, replace the poly
v-belt. If the coolant does not flow through the radiator and through
other components of the cooling system, perform the following
procedures.
Clean the radiator and other components with hot water or steam at low
pressure. Detergent in the water may also be used. Compressed air may be
used to remove materials from the cooling system. Identify the cause of
the restriction before you choose the method for cleaning. Straighten
any fins of the radiator if the fins are bent. Check the high idle of
the 1106 Perkins motor. The engine may overheat if the high idle rpm is
set too high. Remember that temperature and pressure work together. When
a diagnosis is made of a cooling system problem, temperature and
pressure must be checked. The cooling system pressure will have an
effect on the cooling system temperature.

Cooling system pressure at specific altitudes and boiling points of
water - The coolant level must be to the correct level in order to check
the coolant system. The engine must be cold and the engine must not be
running. After the engine is cool, loosen the pressure cap in order to
relieve the pressure out of the cooling system. Then remove the pressure
cap. The level of the coolant should not be more than 13 mm (0.5 inch)
from the bottom of the filler pipe. If the cooling system is equipped
with a sight glass, the coolant should be to the correct level in the
sight glass.
Making the Correct Antifreeze Mixtures - Do not add pure antifreeze to
the cooling system in order to adjust the concentration of antifreeze.
The pure antifreeze increases the concentration of antifreeze in the
cooling system. The increased concentration increases the concentration
of dissolved solids and undissolved chemical inhibitors in the cooling
system. The antifreeze mixture must consist of equal quantities of
antifreeze and clean soft water. The corrosion inhibitor in the
antifreeze will be diluted if a concentration of less than 50% of
antifreeze is used. Concentrations of more than 50% of antifreeze may
have the adverse effect on the performance of the coolant.
Checking the Filler Cap
One cause for a pressure loss in the cooling system can be a faulty seal
on the radiator pressure cap.
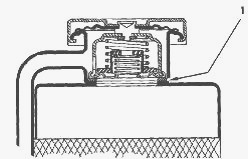
Typical schematic of filler cap - (1) Sealing surface between the
pressure cap and the radiator
To check for the amount of pressure that opens the filler cap, use the
following procedure: After the engine cools, carefully loosen the filler
cap. Slowly release the pressure from the cooling system. Then, remove
the filler cap. Carefully inspect the filler cap. Look for any damage to
the seals and to the sealing surface. Inspect the following components
for any foreign substances: Filler cap, Seal, Surface for seal.
Remove any deposits that are found on these items, and remove any
material that is found on these items. Install the pressure cap onto a
suitable pressurizing Pump. Observe the exact pressure that opens the
filler cap. Compare the pressure to the pressure rating that is found on
the top of the filler cap. If the filler cap is damaged, replace the
filler cap.
Testing The Radiator And Cooling System For Leaks
Use the following procedure to test the radiator and the cooling system
for leaks. When the 1106 Perkins motor has cooled, loosen the filler cap
to the first stop. Allow the pressure to release from the cooling
system. Then remove the filler cap. Make sure that the coolant covers
the top of the radiator core. Put a suitable pressurizing Pump onto the
radiator. Use the pressurizing pump to increase the pressure to an
amount of 20 kPa (3 psi) more than the operating pressure of the filler
cap. Check the radiator for leakage on the outside. Check all
connections and hoses of the cooling system for leaks.
The radiator and the cooling system do not have leakage if all of the
following conditions exist: You do not observe any leakage after five
minutes. The dial indicator remains constant beyond five minutes.
The inside of the cooling system has leakage only if the following
conditions exist: The reading on the gauge goes down. You do not observe
any outside leakage. Make any repairs, as required.
________________________________________________________________________________
________________________________________________________________________________________
 SPECS
SPECS LOADERS
 MAINTENANCE
 PROBLEMS
________________________________________________________________________________________
 MF 1523
 MF 1531
 MF 135
 MF 1547
 MF 1635
________________________________________________________________________________________
________________________________________________________________________________________
 231
231 231S
231S 235
235 240
240 241
241________________________________________________________________________________________
 255
255 265
265 274
274 285
285 375
375________________________________________________________________________________________
________________________________________________________________________________________
 916X Loader
 921X Loader
 926X Loader
 931X Loader
 936X Loader
________________________________________________________________________________________
 941X Loader
 946X Loader
 951X Loader
 956X Loader
 988 Loader
________________________________________________________________________________________
 1655
1655 GS1705
 1742
1742 2635
2635 4608
4608________________________________________________________________________________________
 1080
1080 1100
1100 2615
2615 3050
3050 3060
3060________________________________________________________________________________________
 4708
4708 5455
5455 5450
5450 5610
5610 5613
5613________________________________________________________________________________________
 DL95 Loader
 DL100 Loader
 DL120 Loader
 DL125 Loader
 DL130 Loader
________________________________________________________________________________________
 DL135 Loader
 DL250 Loader
 DL260 Loader
 L90 Loader
 L100 Loader
________________________________________________________________________________________
 6499
6499 7480
7480 7618
7618 7726
7726 1533
1533________________________________________________________________________________________
 2604H
2604H 2607H
2607H 4455
4455 4610M
4610M 4710
4710________________________________________________________________________________________
 L105E Loader
 L210 Loader
 1014 Loader
 1016 Loader
 1462 Loader
________________________________________________________________________________________
 1525 Loader
 1530 Loader
 232 Loader
 838 Loader
 848 Loader
________________________________________________________________________________________
 5712SL
 6713
6713 6715S
6715S 7475
7475 7615
7615________________________________________________________________________________________
 7716
7716 7724
7724 8240
8240 8650
8650 8732
8732________________________________________________________________________________________
 246 Loader
 1036 Loader
 1038 Loader
 1080 Loader
 856 Loader