________________________________________________________________________________
John Deere 5225, 5325, 5425, 5525, 5625 Engine
- JD 5225-5625 Engine
- JD 5225-5625 PTO and Hitch
- JD 5225-5625 Drivetrain
- JD 5225-5625 Hydraulic System
Before Starting the Engine
- Check fuel gauge.
- Transmission Controls: Put gear shift lever in NEUTRAL or PARK and
range shift lever in NEUTRAL.
- PowrReverser Transmission: Put electro-hydraulic (EH) directional
reverser lever in NEUTRAL.
- Disengage PTO. Lever Operated: Pull PTO lever back to disengage. EH
Switch Operated: Push PTO switch knob down to disengage.
- Push hitch control lever forward to lower equipment to the ground. If
equipped with EH hitch controls, bottom half of raise/lower switch can
also be used to lower
equipment to the ground. Switch will only operate when engine is
running.
- Turn key to RUN position and check to see if all indicator bulbs
light.
Operating Ignition Switch
Accessory Position: Turn key to Accessory position to power electrical
functions.
Stop Position: Turn key to STOP position to turn off electrical
accessories and to shut down engine.
Run Position: Turn key to RUN position and check to see if all indicator
bulbs light before advancing to START position. Also use RUN position to
activate cold
weather starting devices. If temperature is below 5C (41F), refer to
Cold Weather Starting procedure in this section.
Start Position: Turn key to START position to crank and start engine.
Key returns to RUN position when released.
Starting the John Deere 5225, 5325, 5425, 5525, 5625 Engine
Dont run a cold engine at full throttle. Idle engine at 1200 rpm until
it warms to operating temperature.
- Start from operator's seat with transmission in neutral or park. For
PowrReverser Transmission, put EH directional reverser lever in neutral.
- Push hand throttle forward from idle position (approximately 1/3 of
full throttle). Engine may not start with throttle pulled completely
down. Dont operate starter
more than 20 seconds at a time. If engine does not start, wait at least
2 minutes for the starter motor to cool before trying again.
- Depress clutch pedal and turn key to START position. Release key when
engine starts. If key is released before engine starts, wait until
starter and engine stop
turning before trying again.
- Warm up tractor carefully. Charging and oil pressure warning
indicators should go off and stay off. Coolant temperature gauge should
begin to move into normal
range.
- Avoid unnecessary engine idling. Check fluid levels frequently for
engine oil, coolant, transmission-hydraulic, and mechanical front wheel
drive (if equipped).
Watch for fluid leaks.
Cold Weather Starting
JD 5225 and JD 5325 Tractors are equipped with glow plugs as a standard
equipment starting aid.
JD 5425, 5525 and JD 5625 Tractors can be equipped with an optional
intake air heater system. An electric heating element warms the intake
air.
- To activate cold weather starting device, turn key to RUN position,
push in and hold: 10 or 15 seconds for temperatures above 0C (32F) / 30
seconds for
temperatures below 0C (32F).
- Depress clutch pedal and turn key to START position.
- If engine runs rough, press in on key to reactivate cold weather
starting device until engine runs smoothly.
- Idle engine at 1200 rpm until it warms to operating temperature.
Checking Engine Indicators and Gauges
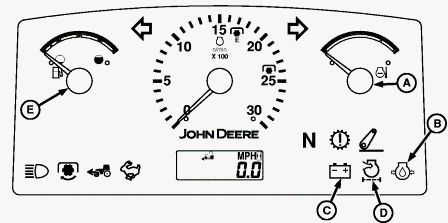
A - Coolant Temperature Gauge, B - Oil Pressure Indicator, C - Charging
System Indicator, D - Air Restriction Indicator, E - Fuel Level Gauge
If temperature gauge (A) indicates hot (red zone), or either charging
system or oil pressure indicators (B or C) fail to go out, stop engine
and determine the cause. If
tractor runs out of fuel and will not start in several tries, bleed air
from fuel system.
Observe Engine Work and Idle Speeds
-
5325, 5225 John Deere: Slow idle speed should be 900 ±50 rpm. At light
or no load, full throttle speed will increase to 2625 ±50 rpm.
-
5525, 5425, 5625 John Deere: Slow idle speed should be 825 ±25 rpm. At
light or no load, full throttle speed will increase to 2625 ±25 rpm.
-
Normal working speed is 1600-2400 rpm rated speed. Within these limits
engine can be put under full load.
With PTO shift lever in 540E position, engine fast idle speed is limited
to 1700 rpm.
For correct PTO speed, run engine at:
- Economical 540E PTO operation (lighter load): Increase engine speed
until tachometer needle is aligned with 1700 rpm mark.
- Standard 540 rpm or 1000 rpm (if equipped) PTO operation (load
requiring full engine power): Increase engine speed until tachometer
needle is aligned with 2400
rpm mark.
Replacing In-Line Fuel Filter
Approximate fuel tank capacity is: 1) Straddle Mount and Hi-Crop-96.5 L
(25.5 gal). 2) Cab and IOOS-126.8 L (33.5 gal).
Filter location: 1) Straddle Mount and Hi-Crop-Front of fuel tank on
left side. 2) Cab and IOOS-Along right side of transmission, under floor
plate.
- Drain fuel tank.
- Remove in-line fuel filter.
- Install new filter with "arrow" toward front of tractor.
- Fill fuel tank.
Checking Engine Oil Level
JD 5525, 5425 and JD 5625: During the first 100 hours of operation, fill
with Original DIESEL ENGINE BREAK-IN OIL. Make sure to push dipstick all
the way in to
check oil level.
- Park tractor on level ground, place transmission in park, turn off
engine and remove key.
- Pull out dipstick. Oil level should be between two marks on dipstick.
- If level is low, add oil through oil filler hole until even with upper
mark. Dont overfill. Use seasonal viscosity grade oil.
Drain Water and Sediment from Fuel Tank and Fuel Filter
Place a small container under drain fitting to catch draining fuel.
Dispose of waste properly.
- Open fuel tank drain plug to bleed accumulated moisture and sediment
from the fuel tank. Tighten plug when clear fuel runs from fitting.
- Raise hood and open fuel filter/water separator drain to bleed
accumulated moisture and sediment from filter. Tighten drain when clear
fuel runs from drain.
Checking Coolant Level
Add make-up coolant through the coolant recovery tank, not directly to
the radiator. If cap must be removed, do not remove when engine is hot.
Shut engine off and
wait until cap is cool enough to touch with bare hands. Slowly loosen
cap to relieve pressure before removing completely. Periodically check
coolant level in
radiator. If cap should become defective, coolant would not be drawn
from recovery tank and could cause the engine to overheat. Replace cap
as necessary.
- Raise hood and check level in coolant recovery tank, before starting
tractor. Coolant level should be checked when engine is cool.
- If engine is cool and level is below "MIN" mark, remove cap and add
coolant to recovery tank to bring level between "MIN" and "MAX" mark.
- Install cap and lower hood.
Changing Engine Oil and Filter (5425, 5525, 5625 John Deere)
- Operate engine to warm oil. Park tractor on level ground, place
transmission in park, turn off engine and remove key. Raise hood.
- Remove oil drain plugand drain oil. Remove engine oil filter. Make
sure old filter gasket is completely removed from manifold before
installing new filter.
- Apply a film of oil on new oil filter gasket and install new filter.
Hand-tighten plus 1/2 turn.
- Install drain plug. Add oil to filler. Engine Crankcase Oil Capacity -
8.5 L (9 qt).
- Start engine and check for leaks.
- Stop engine and remove key. Recheck oil level. Lower hood.
Changing Engine Oil and Filter (John Deere 5225, 5325)
- Operate engine to warm oil. Park tractor on level ground, place
transmission in park, turn off engine and remove key. Raise hood.
- Remove oil drain plug and drain oil. Remove engine oil filter.
- Apply a film of oil on new oil filter gasket and install new filter.
Hand-tighten plus 1/2 turn.
- Install drain plug. Clean area around filler to prevent dirt and
debris from entering valve cover.
- Add oil to filler. Engine Crankcase Oil Capacity - 10L (11 qt).
- Start engine and check for leaks. Stop engine and remove key. Recheck
oil level. Lower hood.
Replacing Fuel Filter (JD 5225, 5325)
- Raise hood. Open drain valve and drain fuel.
- Remove fuel filter. Install new filter.
- Bleed the fuel system.
Replacing Fuel Filter (JD 5425, 5525, 5625)
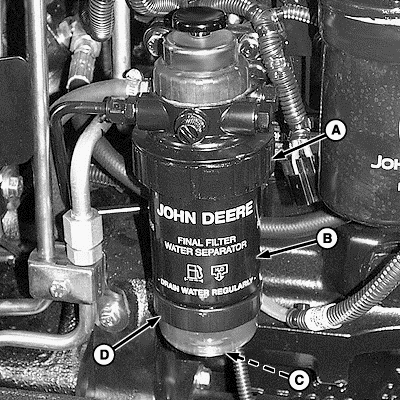
A - Retaining Ring, B - Fuel Filter, C - Drain Valve, D - Water
Separator
- Raise hood. Open drain valve (C) and drain fuel.
- Lift up and rotate retaining ring (A) counterclockwise. Remove ring
with filter (B).
- Remove separator (D) from filter. Drain and clean separator. Dry with
compressed air.
- Install water separator on new filter. Install new filter assembly.
Tighten retaining ring hand-tight.
- Bleed the fuel system.
Check Engine Cooling System
- Never pour cold water into the cooling system of a hot engine, as it
might crack cylinder block or head.
- Dont operate engine without coolant for even a few minutes.
- Check cooling system for leaks. Check and tighten all hoses and clamps
if required. Inspect radiator and coolant recovery tank.
- Make-up coolant is added to the coolant recovery tank rather than
directly to the radiator.
Replacing Air Cleaner Elements
- Release three clips and remove cover. Rotate primary element
counterclockwise and pull out.
- Clean out any dirt in canister, taking care not to damage secondary
filter element. Remove secondary element (inner element) only if it is
to be replaced.
Immediately install new element to prevent dust from entering air intake
system.
- Pull out secondary element if necessary. Clean out inside of cover and
canister. Dont attempt to clean filter elements. They must be replaced
with new elements.
Inspect elements before installing.
- Install air cleaner elements in reverse order of removal using the
following special instructions: Wipe end seal clean before installing a
new element or reinstalling a
used primary element that has not reached the end of it's service
interval. Install cover with inlet "arrow" (stamped in cover) pointing
down.
- If replacing air cleaner canister, make sure that the dust unloader
valve is facing down.
Cleaning Grille Screens, Radiator, Oil Cooler
- Whenever trash builds up on front grille, stop engine and brush clean.
Reduce compressed air to less than 210 kPa (2 bar) (30 psi) when using
for cleaning
purposes. Clear area of bystanders, guard against flying chips, and wear
personal protection equipment including eye protection.
- Raise hood and see if trash has built up on radiator, oil cooler (if
equipped), or A/C condenser (cab). If so, remove it using a brush or
compressed air.
- If a more thorough cleaning is necessary, clean radiator from behind
with compressed air or water. Straighten any bent fins.
Inspecting Fan Belt Tensioner
A belt tension gauge will not give an accurate measurement of the belt
tension. Measure tensioner spring tension using a torque wrench.
- Remove fan belt. Put a mark on swing arm of tensioner as shown.
- Measure 21 mm (0.83 in.) from and put a mark on tensioner mounting
base.
- Rotate the swing arm using a torque wrench until marks are aligned.
John Deere 5225, 5325: PUSH tensioner with torque wrench toward engine.
5425, 5525,
5625 John Deere: PULL tensioner with torque wrench away from engine.
- Record torque wrench measurement and compare with specification. If
recorded measurement is below specifications, have your John Deere
dealer replace
tensioner assembly. Belt Tensioner Torque - 18-22 Nm (159-195 lb-in.).
Install fan belt.
Replacing Fan Belt (JD 5325, 5225)
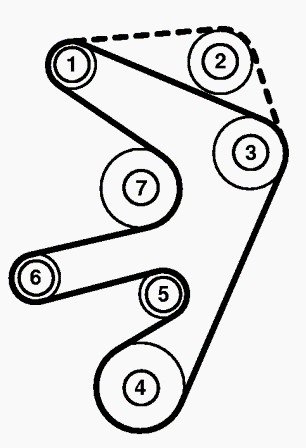
1 - Alternator, 2 - Air Conditioning Compressora, 3 - Idler, 4 -
Crankshaft Pulley, 5 - Coolant Pump, 6 - Tensioner, 7 - Fan Drive
Fan drive belt is equipped with an automatic tensioner which does not
require adjustment.
- Loosen oil fill hose clamp at engine. Remove four hex socket head cap
screws and remove oil fill assembly.
- Remove hex socket head cap screw from bottom of guard.
- Remove two cap screws retaining right-side guard to radiator and
remove guard.
- Remove hex socket head cap screw from bottom of left-side guard.
- Remove cap screw from guard support bracket at engine.
- Remove two cap screws retaining left-side guard to radiator and remove
guard.
- Using a 3/8 in. drive breaker bar inserted in square hole of
tensioner, push tensioner in towards engine and release tension on fan
belt. Remove fan belt from
alternator pulley. Release tension on tensioner and remove breaker bar.
- Remove belt. Install new belt in reverse order of removal.
Replacing Fan Belt (JD 5625, 5525, 5425)
Cab Tractors: Dont remove belt guard fastened to A/C compressor.
Compressor will be loose if cap screws are removed.
- Remove hex socket head cap screw, washer and flanged nut from
right-side guard brace.
- Remove hex socket head cap screw from bottom of guard.
- Remove two cap screws retaining guard to radiator. Remove right-side
guard.
- Remove hex socket head cap screw, washer and flanged nut from
left-side guard brace.
- Remove hex socket head cap screw from bottom of guard.
- Remove two cap screws retaining guard to radiator. Remove left-side
guard.
- Loosen right-side cap screw. Remove left-side cap screw. Swing damper
guard forward away from damper.
- Release tension on belt using a long-handle 1/2 in. drive breaker bar
to pull tensioner away from engine. Remove belt from alternator pulley.
- Release tension on tensioner and remove breaker bar. Remove belt.
Install new belt in reverse order of removal.
Bleeding Fuel System (John Deere 5425, 5525, 5625)
- Check fuel level. Fuel tank must be full. Add if necessary.
- Raise hood and loosen fuel return line.
- Loosen filter base bleed screw.
- Push priming pump until fuel runs out smoothly without spitting, then
tighten bleed screw.
- Loosen injection pump bleed screw.
- Push priming pump until fuel runs out smoothly without spitting, then
tighten fuel return line.
- Tighten bleed screw and lower hood.
Replacing Battery
- Raise hood and remove side screens.
- Remove nut and disconnect negative (ground) battery cable.
- Remove nut and disconnect positive cable.
- Loosen nuts and rotate battery hold-down. Remove battery.
- When replacing battery, use John Deere battery or equivalent. Battery
- 12 Volts
- Install battery in reverse order of removal.
- JD 5225-5625 Engine
- JD 5225-5625 PTO and Hitch
- JD 5225-5625 Drivetrain
- JD 5225-5625 Hydraulic System
________________________________________________________________________________
 JD SPECS
 JD LOADERS
 JD MAINTENANCE
 JD INSTRUCTIONS
 JD PROBLEMS
________________________________________________________________________________________
 JD 2025R
 JD 3039R
 JD 4044R
 JD 4105
 JD 4720
________________________________________________________________________________________
 420 Loader
 419 Loader
 510 Loader
 512 Loader
 520 Loader
________________________________________________________________________________________
 520M Loader
 540M NSL
 540 Loader
 440R Loader
 H180 Loader
________________________________________________________________________________________
 JD 5045E
 JD 5085E
 JD 5100M
 JD 6105R
 JD 6120M
________________________________________________________________________________________
 JD 6155M
 JD 6195R
 JD 6210R
 JD 7210R
 JD 7250R
________________________________________________________________________________________
 JD 7310R
 JD 8245R
 JD 8295R
 JD 8370R
 JD 9370R
________________________________________________________________________________________
 120R Loader
 D120 Loader
 H120 Loader
 45 Loader
 200CX Loader
________________________________________________________________________________________
 D160 Loader
 D170 Loader
 H160 Loader
 H165 Loader
 H240 Loader
________________________________________________________________________________________
 210 Loader
 220R Loader
 300E Loader
 300X Loader
 300CX Loader
________________________________________________________________________________________
 JD 9420R
 JD 9510R
 JD GX335
 JD GX85
 JD LA105
________________________________________________________________________________________
 JD 5065M
 JD 5055D
 JD 5115R
 JD 5105M
 JD 6110R
________________________________________________________________________________________
 JD 6130D
 JD 6225
 JD 7530
 JD 4044M
 JD 7185J
________________________________________________________________________________________
 300 Loader
 300R Loader
 320R Loader
 400E Loader
 410 Loader
________________________________________________________________________________________
 430 Loader
 460 Loader
 521 Loader
 531 Loader
 541 Loader
________________________________________________________________________________________
 551 Loader
 631 Loader
 651 Loader
 661 Loader
 603R Loader
________________________________________________________________________________________
 JD D130
 JD D160
 JD 325
 JD 335
 JD 345
________________________________________________________________________________________
 JD 2520
 JD 3005
 JD 3720
 JD 1025R
 JD 3033R
________________________________________________________________________________________
 JD 5090EL
 JD 5100MH
 JD 5075GV
 JD 6090RC
 JD 6110B
________________________________________________________________________________________
 623R Loader
 643R Loader
 731 Loader
 746 Loader
 751 Loader
________________________________________________________________________________________
 533 Loader
 583 Loader
 633 Loader
 653 Loader
 683 Loader
________________________________________________________________________________________
 H260 Loader
 663R Loader
 663 Loader
 683R Loader
 753 Loader
________________________________________________________________________________________
 JD 6125J
 JD 6150RH
 JD 6210J
 JD 7195J
 JD 8310
________________________________________________________________________________________
 JD 6325
 JD 5525
 JD 5083EN
 JD 5100GN
 JD 5125R
________________________________________________________________________________________
 210C Backhoe
 300D Backhoe
 310G Backhoe
 410G Backhoe
 710G Backhoe
________________________________________________________________________________________
 80 Loader
 100 Loader
 146 Loader
 148 Loader
 158 Loader
________________________________________________________________________________________
 168 Loader
 175 Loader
 522 Loader
 542 Loader
 540R Loader
________________________________________________________________________________________
 562 Loader
 563 Loader
 673 Loader
 741 Loader
________________________________________________________________________________________
 L108 Automatic
 L120 Automatic
 LA110 Automatic
 LA120 Automatic
 LA150 Automatic
________________________________________________________________________________________
 LT155
LT155 LT160 Automatic
 LT180 Automatic
 LTR180
 X165
X165________________________________________________________________________________________
 E100
E100 E120
E120 E150
E150 LTR166
________________________________________________________________________________________
 LA135
LA135 LA165
LA165 LX277
LX277 LX288
LX288 LX255
LX255________________________________________________________________________________________
 S240
S240 GT235
GT235 G110 Automatic
 JD 3203
 JD 5520
________________________________________________________________________________________
 JD 316
 JD 420
 JD 425
 JD 445
________________________________________________________________________________________
 JD_5050D
 X300
X300 X304
X304 X310
X310 X110 Automatic
________________________________________________________________________________________
 H310 Loader
 H340 Loader
 H360 Loader
 H380 Loader
 H480 Loader
________________________________________________________________________________________
 240 Loader
 245 Loader
 260 Loader
 265 Loader
 280 Loader
________________________________________________________________________________________
 600R Loader
 620R Loader
 640R Loader
 660R Loader
 680R Loader
________________________________________________________________________________________
 JD_5039D
 X146R
X146R X360
X360 X155R
X155R X140 Automatic
________________________________________________________________________________________
 X350
X350 X380
X380 X500
X500 X590
X590 X700
X700________________________________________________________________________________________
 3036E
3036E 2038R
2038R 3038R
3038R 4049M
4049M JD 4100
________________________________________________________________________________________
 X738
X738 X740
X740 X748
X748 X749
X749 X950R
X950R________________________________________________________________________________________
 JD 4510
 5045D
5045D 5050E
5050E 5060E
5060E 5078E
5078E