
________________________________________________________________________________
1106 Perkins diesel - Crankshaft (Remove and install)
Removal Procedure
Remove the engine oil pump. Remove the front housing. Remove the
crankshaft rear seal. Remove the rocker shaft and pushrods. If
necessary, remove the cylinder head. If necessary, remove the pistons
and connecting rods. The 1106 Perkins diesel should be mounted on a
suitable stand and placed in the inverted position. If the cylinder
head, the pistons and the connecting rods have not been removed already,
remove the connecting rod bearings. Ensure that the main bearing caps
are marked for the location and orientation.
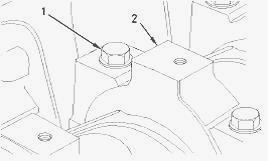
Remove the setscrews (1) and the main bearing caps (2) from the cylinder
block. Remove the lower main bearing shells (3) from the main bearing
caps (2). Keep the lower main bearing shells with the respective main
bearing caps. The lower main bearing shells are plain bearings that have
no oil holes.
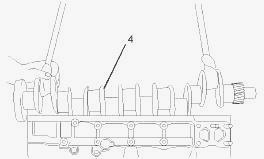
Attach lifting straps and a suitable lifting device to the crankshaft
(4). Lift the crankshaft (4) out of the cylinder block. The weight of
the crankshaft is approximately 61 kg (134.5 lb). Do not damage any of
the finished surfaces on the crankshaft. When the crankshaft is removed
from the engine, the crankshaft must be supported on a suitable stand in
order to prevent damage to the crankshaft timing ring.
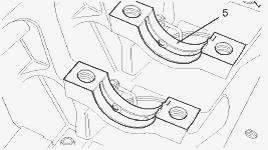
Remove the upper main bearing shells (5) from the 1106D Perkins cylinder
block. Keep the upper main bearing shells with the respective main
bearing caps. The upper main bearing shells have a groove and two oil
holes. Remove the two thrust washers from number six main bearing in the
cylinder block. If necessary, remove the crankshaft timing ring. If
necessary, remove the crankshaft gear.
Installation Procedure
Clean the crankshaft and inspect the crankshaft for wear or damage. If
necessary, replace the crankshaft or recondition the crankshaft. If
necessary, install the crankshaft gear. If necessary, install a new
crankshaft timing ring Ensure that the parent bores for the bearing
shells in the cylinder block are clean. Ensure that the threads for the
main bearing setscrews in the cylinder block are clean and free from
damage.
Clean the main bearing shells and the thrust washers. Inspect the main
bearing shells and the thrust washers for wear or damage. If necessary,
replace the main bearing shells and the thrust washers. If the main
bearing shells are replaced, check whether oversize main bearing shells
were previously installed. If the thrust washers are replaced, check
whether oversize thrust washers were previously installed.
Install upper main bearing shells (5) to the cylinder block. Ensure that
the locating tabs for the upper main bearing shells are seated in the
slots in the cylinder block. The upper main bearing shells have a groove
and two oil holes. Lubricate the upper main bearing shells (5) with
clean engine oil.
Attach lifting straps and a suitable lifting device to the crankshaft
(4). Lift the crankshaft (4) into the cylinder block. The weight of the
crankshaft is approximately 61 kg (134.5 lb). Do not damage any of the
finished surfaces on the crankshaft. Do not damage the main bearing
shells.
Lubricate the thrust washers (6) with clean engine oil. Install the
thrust washers (6) into number six main bearing in the cylinder block.
The thrust washers have a locating tab at one end. Ensure that the
locating tabs are correctly seated in the cylinder block. Install lower
main bearing shells (3) into the main bearing caps (2). Ensure that the
locating tabs for the lower main bearing shells are correctly seated
into the slots in the bearing caps.
The lower main bearing shells are plain bearings that do not have oil
holes. Lubricate the lower main bearing shells (3) and lubricate the
journals of the crankshaft (4) with clean engine oil. Install the main
bearing caps (2) to the cylinder block. Ensure the correct location and
orientation of the main bearing caps (2). The locating tabs for the
upper and the lower main bearing shells should be on the same side of
the 1106 Perkins diesel engine.
Lubricate the threads of the setscrews (1) with clean engine oil.
Lubricate the underside of the heads of the setscrews (1) with clean
engine oil. Install the setscrews (1) to the main bearing caps (2).
Evenly tighten the setscrews in order to pull the caps into position.
Ensure that the caps are correctly seated. Do not tap the main bearing
caps into position as the bearing shells may be dislodged.
Tighten the setscrews (1) to a torque of 80 Nm (59 lb ft). Turn the
setscrews (1) through an additional 90 degrees. Use Tooling to achieve
the final torque. Rotate the crankshaft in order to ensure that there is
no binding. Check the crankshaft end play. Push the crankshaft toward
the front of the engine. Install Tooling to the cylinder block and the
rear face of the crankshaft. Push the crankshaft toward the rear of the
engine. Use Tooling to measure the crankshaft end play. The permissible
crankshaft end play is 0.17 mm (0.007 inch) to 0.41 mm (0.016 inch).
If the crankshaft has been replaced or the crankshaft has been
reconditioned, inspect the height of the piston above the cylinder
block. If the crankshaft has not been replaced or the crankshaft has not
been reconditioned, install the connecting rod bearings. If necessary,
install the pistons and connecting rods. If necessary, install the
cylinder head. Install the rockershaft and pushrods. Install the
crankshaft rear seal. Install the front housing. Install the engine oil
pump.
________________________________________________________________________________
________________________________________________________________________________________
 SPECS
SPECS LOADERS
 MAINTENANCE
 PROBLEMS
________________________________________________________________________________________
 MF 1523
 MF 1531
 MF 135
 MF 1547
 MF 1635
________________________________________________________________________________________
________________________________________________________________________________________
 231
231 231S
231S 235
235 240
240 241
241________________________________________________________________________________________
 255
255 265
265 274
274 285
285 375
375________________________________________________________________________________________
________________________________________________________________________________________
 916X Loader
 921X Loader
 926X Loader
 931X Loader
 936X Loader
________________________________________________________________________________________
 941X Loader
 946X Loader
 951X Loader
 956X Loader
 988 Loader
________________________________________________________________________________________
 1655
1655 GS1705
 1742
1742 2635
2635 4608
4608________________________________________________________________________________________
 1080
1080 1100
1100 2615
2615 3050
3050 3060
3060________________________________________________________________________________________
 4708
4708 5455
5455 5450
5450 5610
5610 5613
5613________________________________________________________________________________________
 DL95 Loader
 DL100 Loader
 DL120 Loader
 DL125 Loader
 DL130 Loader
________________________________________________________________________________________
 DL135 Loader
 DL250 Loader
 DL260 Loader
 L90 Loader
 L100 Loader
________________________________________________________________________________________
 6499
6499 7480
7480 7618
7618 7726
7726 1533
1533________________________________________________________________________________________
 2604H
2604H 2607H
2607H 4455
4455 4610M
4610M 4710
4710________________________________________________________________________________________
 L105E Loader
 L210 Loader
 1014 Loader
 1016 Loader
 1462 Loader
________________________________________________________________________________________
 1525 Loader
 1530 Loader
 232 Loader
 838 Loader
 848 Loader
________________________________________________________________________________________
 5712SL
 6713
6713 6715S
6715S 7475
7475 7615
7615________________________________________________________________________________________
 7716
7716 7724
7724 8240
8240 8650
8650 8732
8732________________________________________________________________________________________
 246 Loader
 1036 Loader
 1038 Loader
 1080 Loader
 856 Loader