
________________________________________________________________________________
1106 Perkins engine - Fuel Injection Lines (Remove and install)
Removal procedure
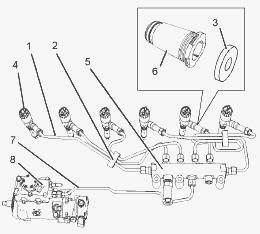
Isolate the fuel supply. Isolate the electrical supply. Remove the two
plastic clamps (2) from the fuel injection lines (1). Discard the
plastic clamps. Slide the dust seal (3) from the nut on the fuel
injection line (1). Disconnect the fuel injection line (1) at the
electronic unit injector (4). Disconnect the fuel injection line (1) at
the fuel manifold (5).
Remove the fuel injection line (1). Discard the fuel injection line.
Clean up any spillage of fuel immediately. Plug the open port in the
fuel manifold (5) immediately. Use Tooling in order to plug the open
port in the fuel manifold. Remove the seal (6) from the electronic unit
injector (4) and the base of the valve mechanism cover (not shown). The
seal can be damaged by contact with fuel.
Plug the open port in electronic unit injector (4) immediately. Use
Tooling in order to plug the open port in the electronic unit injector.
Repeat Steps in order to remove the remaining fuel injection lines from
the fuel manifold to the electronic unit injectors.

Disconnect the harness assembly (9) from the fuel injection pump (8).
Slide the locking tab (10) into the unlocked position. Disconnect the
harness assembly (9) from the position sensor (11). Position the harness
assembly (9) so that the harness assembly is clear of the fuel injection
line (7).
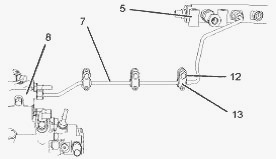
Assembly of the tube clip
Remove the fasteners (12) from the three tube clips (13) that secure the
fuel injection line (7). Loosen the three allen head screws (14).
Position the tube clips in order to allow removal of the fuel injection
line. Disconnect the fuel injection line (7) at the fuel injection pump
(8). Disconnect the fuel injection line (7) at the fuel manifold (5).
Plug all open ports immediately. Use Tooling in order to plug the open
ports in the fuel manifold (5) and in the fuel injection pump (8).
Remove the fuel injection line (7). Clean up any spillage of fuel
immediately. Remove the allen head screws (14) and the assemblies of the
three tube clips (13) from fuel injection line (7). Discard the fuel
injection line.
Installation procedure
The following procedure should be adopted in order to install the fuel
injection lines when the electronic unit injectors or the fuel manifold
have not been removed.
Assembly of the tube clip
Loosely install the assemblies of the three tube clips (13) and the
allen head screws (14) to the fuel injection line (7). Place the fuel
injection line (7) in position. Remove the caps from the port in the
fuel injection pump (8) and from the appropriate port in the fuel
manifold (5). Remove the caps from the new fuel injection line (7).
Loosely connect the nuts at both ends of the fuel injection line (7), to
the fuel manifold (5) and to the fuel injection pump (8). Ensure that
the ends of the fuel injection line are correctly seated in the fuel
injection pump and in the fuel manifold. Use Tooling to tighten the nuts
on the fuel injection line (7) to a torque of 30 Nm (22 lb ft).
Install the setscrews (12) for the three tube clips (13) that secure the
fuel injection line (7). Tighten the setscrews (12) to a torque of 22
N·m (16 lb ft). Tighten the M5 allen head screws (14) to a torque of 10
Nm (89 lb in). Ensure that fuel injection line does not contact any
other engine component.
Connect the harness assembly (9) to the position sensor (11). Slide the
locking tab (10) into the locked position. Connect the harness assembly
(9) to the fuel injection pump (8).
Thoroughly clean the seal (6). Inspect the seal for damage. If
necessary, replace the seal. The seal can be damaged by contact with
fuel. If the seal has been in contact with fuel for a prolonged period,
the seal should be replaced. Install the seal (6) to the electronic unit
injector (4). Ensure that the flange on the seal is flush with the valve
mechanism cover base.
Remove the caps from the new fuel injection line (1). Ensure that a new
dust seal (3) is installed to the fuel injection line. Remove the caps
from the electronic unit injector (4) and from the appropriate port in
the fuel manifold (5). Loosely connect the nuts at both ends of the fuel
injection line (1), to the electronic unit injector (4) and to the
appropriate port in the fuel manifold (5).
Ensure that the ends of the fuel injection line are correctly seated in
the electronic unit injector and in the fuel manifold. Use Tooling to
tighten the nuts on the fuel injection line (1) to a torque of 30 Nm (22
lb ft). Slide the dust seal (3) into position over the nut on the fuel
injection line. Ensure that the dust seal (3) is in contact with the
seal (6).
Follow Steps in order to install the remaining fuel injection lines.
Install two new clamps (2) to the fuel injection lines. Ensure that the
clamps are fully closed in order to retain the fuel injection lines.
Ensure that fuel injection lines do not contact any other engine
component. Restore the fuel supply. Restore the electrical supply.
Remove the air from the fuel system.
________________________________________________________________________________
________________________________________________________________________________________
 SPECS
SPECS LOADERS
 MAINTENANCE
 PROBLEMS
________________________________________________________________________________________
 MF 1523
 MF 1531
 MF 135
 MF 1547
 MF 1635
________________________________________________________________________________________
________________________________________________________________________________________
 231
231 231S
231S 235
235 240
240 241
241________________________________________________________________________________________
 255
255 265
265 274
274 285
285 375
375________________________________________________________________________________________
________________________________________________________________________________________
 916X Loader
 921X Loader
 926X Loader
 931X Loader
 936X Loader
________________________________________________________________________________________
 941X Loader
 946X Loader
 951X Loader
 956X Loader
 988 Loader
________________________________________________________________________________________
 1655
1655 GS1705
 1742
1742 2635
2635 4608
4608________________________________________________________________________________________
 1080
1080 1100
1100 2615
2615 3050
3050 3060
3060________________________________________________________________________________________
 4708
4708 5455
5455 5450
5450 5610
5610 5613
5613________________________________________________________________________________________
 DL95 Loader
 DL100 Loader
 DL120 Loader
 DL125 Loader
 DL130 Loader
________________________________________________________________________________________
 DL135 Loader
 DL250 Loader
 DL260 Loader
 L90 Loader
 L100 Loader
________________________________________________________________________________________
 6499
6499 7480
7480 7618
7618 7726
7726 1533
1533________________________________________________________________________________________
 2604H
2604H 2607H
2607H 4455
4455 4610M
4610M 4710
4710________________________________________________________________________________________
 L105E Loader
 L210 Loader
 1014 Loader
 1016 Loader
 1462 Loader
________________________________________________________________________________________
 1525 Loader
 1530 Loader
 232 Loader
 838 Loader
 848 Loader
________________________________________________________________________________________
 5712SL
 6713
6713 6715S
6715S 7475
7475 7615
7615________________________________________________________________________________________
 7716
7716 7724
7724 8240
8240 8650
8650 8732
8732________________________________________________________________________________________
 246 Loader
 1036 Loader
 1038 Loader
 1080 Loader
 856 Loader