
________________________________________________________________________________
Perkins 1106D - Remove and Install Gear Group (Front)
Removal Procedure
Tool Part: A - 21825576 Crankshaft Turning Tool, B - 27610212 Camshaft
Timing Pin, C - 27610286 Crankshaft Timing Pin.
Remove the front cover. Remove the valve mechanism cover. Either Tooling
(A) can be used. Use the Tooling that is most suitable. Care must be
taken in order to ensure that the fuel injection pump timing is not lost
during the removal of the front gear group.
Carefully follow the procedure in order to remove the gear group. Use
Tooling (A) in order to rotate the crankshaft so that number one piston
is at top dead center on the compression stroke.
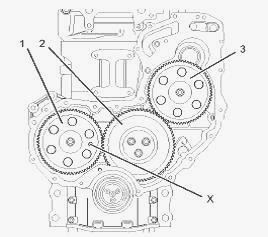
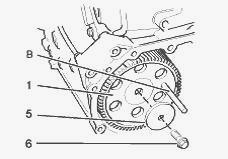
Install Tooling (B) through the hole (X) in the camshaft gear (1) into
the front housing. Use Tooling (B) in order to lock the camshaft in the
correct position.
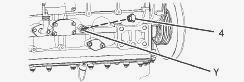
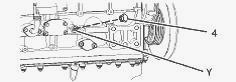
Remove the plug (4) from the cylinder block. Install Tooling (C) into
the hole (Y) in the cylinder block. Use Tooling (C) in order to lock the
crankshaft in the correct position. Do not use excessive force to
install Tooling (C). Do not use Tooling (C) to hold the crankshaft
during repairs.
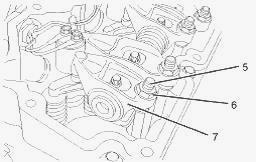
Loosen the nuts (6) on all rocker arms (7). Unscrew the adjusters (5) on
all rocker arms (7) until all valves are fully closed. Failure to ensure
that ALL adjusters are fully unscrewed can result in contact between the
valves and pistons. Apply sufficient pressure to the fuel injection pump
gear (3) in a counterclockwise direction in order to remove the
backlash. Lock the fuel injection pump in this position.
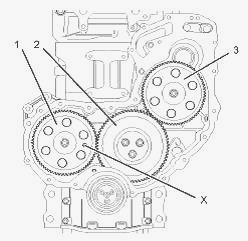
Mark the gears (1), (2) and (3) in order to show alignment. Refer to
Illustration. Identification will ensure that the gears can be installed
in the original alignment. Remove the fuel pump gear (3). Remove the
camshaft gear (1). Remove the idler gear (2).
Installation Procedure
The fuel injection pump must remain locked until the procedure instructs
you to unlock the fuel injection pump. Ensure that number one piston is
at top dead center on the compression stroke.
If necessary, install Tooling (C) into the hole (Y) in the cylinder
block. Use Tooling (C) in order to lock the crankshaft in the correct
position. Do not use excessive force to install Tooling (C). Do not use
Tooling (C) to hold the crankshaft during repairs. Ensure that all of
the components of the front gear group are clean and free from wear of
damage. If necessary, replace any components that are worn or damaged.
Install the camshaft gear (1). Loosely install the setscrew (6) and the
washer (5) for the camshaft gear
Install Tooling (B) through the hole (X) in the camshaft gear (1) into
the front housing.


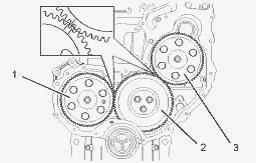
Alignment of timing marks
Install the idler gear (2). Ensure that the timing marks on the gears
(1) and (2) are in alignment and that the mesh of the gears is correct.
Check the end play of the idler gear. Tighten the setscrew (6) for the
camshaft gear to a torque of 95 Nm (70 lb ft). Check the end play of the
camshaft gear.
Ensure that the fuel injection pump is locked in the correct position.
Install the fuel injection pump gear (3). Ensure that the timing marks
on the gears (2) and (3) are in alignment. See Illustration. Ensure that
the mesh of the gears is correct. Remove the Tooling (B) and (C).
Install the plug (4) into hole (Y) in the cylinder block. Refer to
Illustration.
Ensure that the backlash for the gears (1), (2) and (3) is within
specified values. Lubricate each gear with clean engine oil. Adjust the
engine valve lash.
________________________________________________________________________________
________________________________________________________________________________________
 SPECS
SPECS LOADERS
 MAINTENANCE
 PROBLEMS
________________________________________________________________________________________
 MF 1523
 MF 1531
 MF 135
 MF 1547
 MF 1635
________________________________________________________________________________________
________________________________________________________________________________________
 231
231 231S
231S 235
235 240
240 241
241________________________________________________________________________________________
 255
255 265
265 274
274 285
285 375
375________________________________________________________________________________________
________________________________________________________________________________________
 916X Loader
 921X Loader
 926X Loader
 931X Loader
 936X Loader
________________________________________________________________________________________
 941X Loader
 946X Loader
 951X Loader
 956X Loader
 988 Loader
________________________________________________________________________________________
 1655
1655 GS1705
 1742
1742 2635
2635 4608
4608________________________________________________________________________________________
 1080
1080 1100
1100 2615
2615 3050
3050 3060
3060________________________________________________________________________________________
 4708
4708 5455
5455 5450
5450 5610
5610 5613
5613________________________________________________________________________________________
 DL95 Loader
 DL100 Loader
 DL120 Loader
 DL125 Loader
 DL130 Loader
________________________________________________________________________________________
 DL135 Loader
 DL250 Loader
 DL260 Loader
 L90 Loader
 L100 Loader
________________________________________________________________________________________
 6499
6499 7480
7480 7618
7618 7726
7726 1533
1533________________________________________________________________________________________
 2604H
2604H 2607H
2607H 4455
4455 4610M
4610M 4710
4710________________________________________________________________________________________
 L105E Loader
 L210 Loader
 1014 Loader
 1016 Loader
 1462 Loader
________________________________________________________________________________________
 1525 Loader
 1530 Loader
 232 Loader
 838 Loader
 848 Loader
________________________________________________________________________________________
 5712SL
 6713
6713 6715S
6715S 7475
7475 7615
7615________________________________________________________________________________________
 7716
7716 7724
7724 8240
8240 8650
8650 8732
8732________________________________________________________________________________________
 246 Loader
 1036 Loader
 1038 Loader
 1080 Loader
 856 Loader