
________________________________________________________________________________
Perkins 1106D - Vibration Damper and Pulley remove and install
Removal Procedure
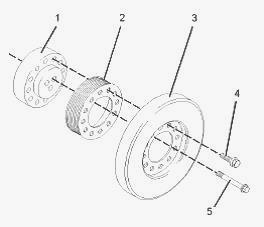
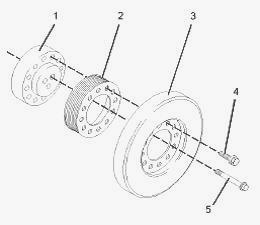
Pulleys with Split Lock Rings
Remove: the Alternator belt. Install
Tooling into one of the unused threads in the assembly of the crankshaft
pulley, the vibration damper and the crankshaft adapter.

- the setscrews (4).
- the vibration damper (3) and the crankshaft pulley (2) from the
crankshaft adapter (1).
- Tooling from the crankshaft adapter (1). Use a suitable tool in order
to prevent the crankshaft from rotating. Use Tooling to remove the three
torx screws (5). Hold a wood block against the crankshaft adapter (1).
Strike the wood block with a hammer in order to loosen the split lock
rings (9).
- the crankshaft adapter (1) from the crankshaft.
- the thrust block (6) from the crankshaft adapter (1).
- the O-ring seal (7) from the thrust block (6). Discard the O-ring
seal.
- the split lock rings (9) and the spacer (8) from the crankshaft
adapter (1). Note the position and orientation of the split lock rings
and the spacer.
Pulleys without Split Lock Rings
Remove:
- the alternator belt. The weight of the assembly of the crankshaft
pulley, the vibration damper and the crankshaft adapter is approximately
22 kg (48 lb).
- Remove the vibration damper and the crankshaft pulley before the
crankshaft adapter is removed from the engine.
- one of the setscrews (4). Install Tooling into the assembly of the
crankshaft pulley, the vibration damper and the crankshaft adapter.
- the five remaining setscrews (4).
- the vibration damper (3) and the crankshaft pulley (2) from the
crankshaft adapter (1).
- Tooling from the crankshaft adapter (1). Use a suitable tool in order
to prevent the crankshaft from rotating. Use Tooling to remove the three
torx screws (5).
- the crankshaft adapter (1) from the crankshaft.
Installation Procedure
Pulleys with Split Lock Rings
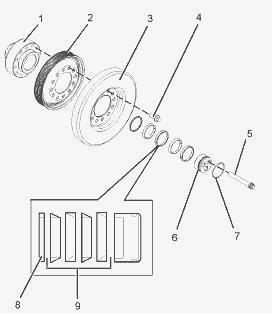
Ensure that the crankshaft adapter, the split lock rings, the spacer and
the thrust block are clean and free from damage. Replace any components
that are damaged. Install:
- a new O-ring seal (7) to the thrust block (6).
- the spacer (8) to the crankshaft adapter (1).
- both pairs of split lock rings (9) to the crankshaft adapter (1).
There is an internal split lock ring and an external lock ring. Ensure
that the split lock rings are installed in the correct position. Refer
to Illustration. Position the gap in the split lock rings at 180 degrees
away from each other. Ensure that the front of the crankshaft is clean
and free from damage.
- the crankshaft adapter (1) onto the crankshaft. Align the holes in the
thrust block with the holes in the crankshaft.
- the thrust block (6) into the crankshaft adapter (1).
- the three torx screws (5) to the thrust block (6). Use a suitable tool
in order to prevent the crankshaft from rotating. Use Tooling to tighten
the torx screws to a torque of 200 Nm (147 lb ft). Repeat Step two more
times in order to ensure correct torque.
- Tooling to the crankshaft adapter (1). Align the crankshaft pulley (2)
with Tooling.
- the crankshaft pulley to the crankshaft adapter (1). Inspect the
vibration damper for damage. If necessary, replace the vibration damper.
Align the vibration damper (3) with Tooling.
- the vibration damper to the crankshaft adapter (1).
- the four setscrews (4) to the assembly of the crankshaft pulley, the
vibration damper and the crankshaft adapter. The setscrews should be
evenly spaced. Remove Tooling. Use a suitable tool in order to prevent
the crankshaft from rotating. Tighten the setscrews (4) to a torque of
115 Nm (85 lb ft).
- the alternator belt.
Pulleys without Split Lock Rings
Ensure that the crankshaft adapter and the front of the crankshaft are
clean and free from damage. Install the crankshaft adapter (1) to the
crankshaft. Install:
- the three torx screws (3) to the crankshaft adapter (1). Use a
suitable tool in order to prevent the crankshaft from rotating. Use
Tooling to tighten the torx screws to a torque of 200 N·m (147 lb ft).
Repeat Step two more times in order to ensure correct torque.
- Tooling to the crankshaft adapter (1). Align the crankshaft pulley (2)
with Tooling. Install the crankshaft pulley to the crankshaft adapter
(1). Inspect the vibration damper for damage. If necessary, replace the
vibration damper.
Align the vibration damper (3) with Tooling.
- the vibration damper to the crankshaft adapter (1).
- the setscrews (4) to the assembly of the crankshaft pulley, the
vibration damper and the crankshaft adapter. Remove Tooling.
- the remaining setscrew (4). The setscrews should be evenly spaced. Use
a suitable tool in order to prevent the crankshaft from rotating.
Tighten the setscrews (4) to a torque of 115 N·m (85 lb ft).
- the alternator belt.
________________________________________________________________________________
________________________________________________________________________________________
 SPECS
SPECS LOADERS
 MAINTENANCE
 PROBLEMS
________________________________________________________________________________________
 MF 1523
 MF 1531
 MF 135
 MF 1547
 MF 1635
________________________________________________________________________________________
________________________________________________________________________________________
 231
231 231S
231S 235
235 240
240 241
241________________________________________________________________________________________
 255
255 265
265 274
274 285
285 375
375________________________________________________________________________________________
________________________________________________________________________________________
 916X Loader
 921X Loader
 926X Loader
 931X Loader
 936X Loader
________________________________________________________________________________________
 941X Loader
 946X Loader
 951X Loader
 956X Loader
 988 Loader
________________________________________________________________________________________
 1655
1655 GS1705
 1742
1742 2635
2635 4608
4608________________________________________________________________________________________
 1080
1080 1100
1100 2615
2615 3050
3050 3060
3060________________________________________________________________________________________
 4708
4708 5455
5455 5450
5450 5610
5610 5613
5613________________________________________________________________________________________
 DL95 Loader
 DL100 Loader
 DL120 Loader
 DL125 Loader
 DL130 Loader
________________________________________________________________________________________
 DL135 Loader
 DL250 Loader
 DL260 Loader
 L90 Loader
 L100 Loader
________________________________________________________________________________________
 6499
6499 7480
7480 7618
7618 7726
7726 1533
1533________________________________________________________________________________________
 2604H
2604H 2607H
2607H 4455
4455 4610M
4610M 4710
4710________________________________________________________________________________________
 L105E Loader
 L210 Loader
 1014 Loader
 1016 Loader
 1462 Loader
________________________________________________________________________________________
 1525 Loader
 1530 Loader
 232 Loader
 838 Loader
 848 Loader
________________________________________________________________________________________
 5712SL
 6713
6713 6715S
6715S 7475
7475 7615
7615________________________________________________________________________________________
 7716
7716 7724
7724 8240
8240 8650
8650 8732
8732________________________________________________________________________________________
 246 Loader
 1036 Loader
 1038 Loader
 1080 Loader
 856 Loader