________________________________________________________________________________
1006 Perkins Motor - Power Shuttle Spacer (MF 8200)
Removing and refitting the spacer
MF 8210, 8220, 8240 and 8250 Tractors equipped with a Power Shuttle are
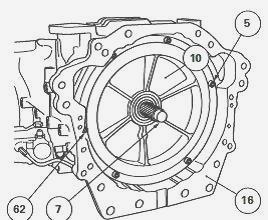
fitted with a spacer (16) (Fig1) inserted between the 1006 Perkins
engine and the gearbox. The design of this spacer is similar to that
fitted on the 8200 MF tractor equipped with a mechanical reverse
shuttle. However, it should be noted that its closure disk has a
different profile so that it can be fitted with the hydromechanical
assembly of the power shuttle.

Split the tractor between the engine and gearbox. Disassemble the four
screws (dia. 10 mm) on each front Silent Block on the right- and
left-hand cab bearers. If the side fuel tank was not removed during the
separation operation, drain the gas-oil and remove the footstep in
question then the fuel tank.
Raise and block the cab. Remove the cab supports (right and left) and
any adjacent parts likely to obstruct removal of the spacer. Drain the
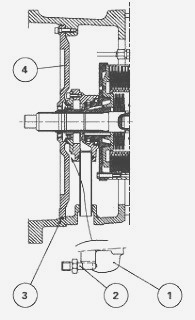
gearbox. Install protector on main shaft (19) (Fig1). Remove screws (1)
(2).
Special point - In order to facilitate unsticking of closure disk (4)
(Fig1), use the tapped holes and two screws of sufficient length to
extract and maintain the disk before removing it. Scrap seal (3)
(Fig.5).
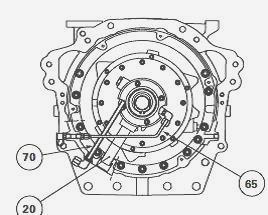
Remove lube tube (78) from the power shuttle clutches located under the
gearbox between spacer (16) and intermediate housing (19) (Fig4). Remove
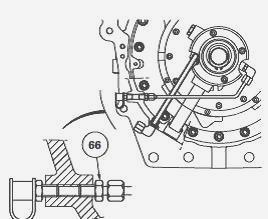
tubes (31) (86) (optional) and (74) (87) (94) and finally union (66)
(Figs. 2 - 3). Remove the clutch from the power shuttle (optional) using
the locally-made tool.

Removing the spacer - The cab inner floor contains an access door. If
necessary, use the latter for accessing the top screws securing the
spacer to the gearbox. Remove screws (1) (4) (5) (7) and nuts (8) on
spacer (16). Remove washers (3). Assisted by an operator, unstick and
remove the spacer. If necessary, extract studs (9) from the gearbox
housing.

Refitting - Clean the parts and replace any that are defective. Remove
all traces of old Loctite from the mating surfaces. Coat the mating face
of the spacer (gearbox side) with Loctite 5206 or equivalent. Ensure
presence of locating pins (6) (Fig4).
Studs (9) are smeared with Loctite 270 and locked into the gearbox.
Refit the spacer. Coat the screws and nuts with Loctite 270 and torque
to following values: screws (1) and nuts (2): 150 - 200 Nm, screws (4)
(5) (7) and nuts (8): 100 - 130 Nm. If necessary, coat union (96) with
Loctite 542 then screw it onto the spacer (Fig2).
If necessary, refit the front clutch of the power shuttle. Reconnect the
tubes. Refit the 8200 MF tractor clutch and tubes. Ensure the presence
of centring pins G (Fig1) on the closure disk (4) and of shims
lubricating pump cover. Replace O'ring (3) (Fig5).

Coat surrounds P of the tapped holes with Loctite 5206. Grease the lip
of the seal fitted on the closure disk. Fit the shaft with the protector
used during disassembly. Screw two guide studs in opposing locations on
the spacer, and reinstall closure disk (4) and finger (2) in the slot in
pump body (1) (Fig5). Install long screws (2) in the same holes as those
provided for the centring pins. Install screws (1) (Fig.1). Torque all
screws to 36 - 46 Nm.
Refit the cab supports and any neighbouring parts that were removed.
Coat the screws for the supports with Loctite 270 then insert and torque
to 200-260 Nm. If it was removed, reinstall the access door in the cab
floor. Service the oil in the sumps and check level on sight glass
located on left of centre housing.
Remove the props and set back the cab. Torque up the screws (D=10 mm) on
each Silent Block support to 50 - 70 Nm. Reassemble the tractor between
the Perkins 1006 Motor and gearbox. Check the following: tightness of
hydraulic unions and mating face, operation of the power shuttle.
________________________________________________________________________________
________________________________________________________________________________________
________________________________________________________________________________________
________________________________________________________________________________________
________________________________________________________________________________________
________________________________________________________________________________________
________________________________________________________________________________________
________________________________________________________________________________________
________________________________________________________________________________________
________________________________________________________________________________________
________________________________________________________________________________________
________________________________________________________________________________________
________________________________________________________________________________________
________________________________________________________________________________________
________________________________________________________________________________________
________________________________________________________________________________________
________________________________________________________________________________________
________________________________________________________________________________________
________________________________________________________________________________________
 SPECS
SPECS LOADERS
 MAINTENANCE
 PROBLEMS
 MF 1523
 MF 1531
 MF 135
 MF 1547
 MF 1635
 231
231 231S
231S 235
235 240
240 241
241 255
255 265
265 274
274 285
285 375
375 916X Loader
 921X Loader
 926X Loader
 931X Loader
 936X Loader
 941X Loader
 946X Loader
 951X Loader
 956X Loader
 988 Loader
 1655
1655 GS1705
 1742
1742 2635
2635 4608
4608 1080
1080 1100
1100 2615
2615 3050
3050 3060
3060 4708
4708 5455
5455 5450
5450 5610
5610 5613
5613 DL95 Loader
 DL100 Loader
 DL120 Loader
 DL125 Loader
 DL130 Loader
 DL135 Loader
 DL250 Loader
 DL260 Loader
 L90 Loader
 L100 Loader
 6499
6499 7480
7480 7618
7618 7726
7726 1533
1533 2604H
2604H 2607H
2607H 4455
4455 4610M
4610M 4710
4710 L105E Loader
 L210 Loader
 1014 Loader
 1016 Loader
 1462 Loader
 1525 Loader
 1530 Loader
 232 Loader
 838 Loader
 848 Loader
 5712SL
 6713
6713 6715S
6715S 7475
7475 7615
7615 7716
7716 7724
7724 8240
8240 8650
8650 8732
8732 246 Loader
 1036 Loader
 1038 Loader
 1080 Loader
 856 Loader