________________________________________________________________________________
Massey Ferguson 6160, 6170 hydraulic circuit right-hand cover
Removing and install
Immobilise the Massey Ferguson 6160, 6170 tractor. Chock the left rear
wheel.
Put on the handbrake. Chock between the frame and the front axle.
Partially bleed the rear axle housing.
Take off the wheel concerned. Position an axle stand.
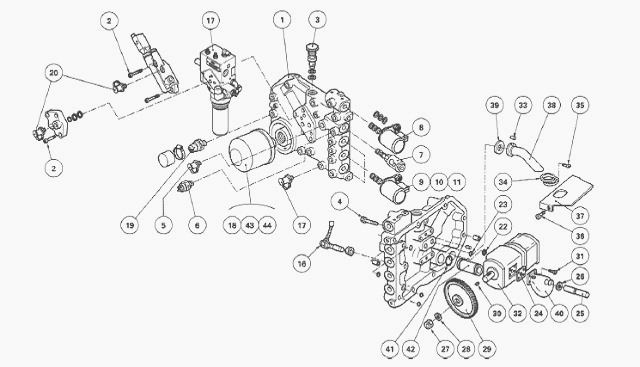
Removal
Disconnect the clogging indicator harness (12), and remove the 15 micron
filter (14) and its base.
Disconnect and block off the hydraulic unions supplying the spool
valves.
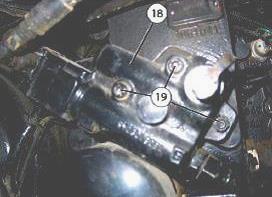
If the tractor is equipped with a trailer braking system, take out the
screw and (19) remove the valve (18).
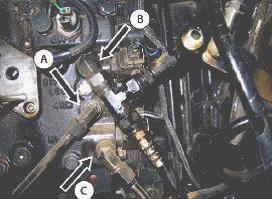
Disconnect and block off the hydraulic unions on the block (17).
Remove the block (17). Disconnect and block off the hydraulic unions (A)
(B) (C) on the right-hand cover.
Disconnect and block off the hydraulic union (D) on the MF 6160, 6170
hydraulic circuit right-hand cover.
Locate and disconnect the solenoid valve electrical connectors.
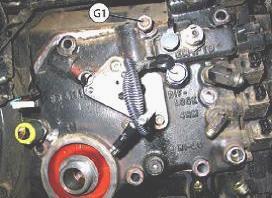
Remove the suction strainer (18). Disconnect and remove the filtration
switch (19).
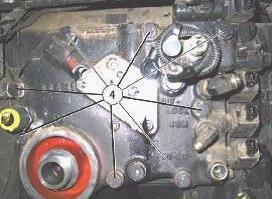
Loosen and remove the screws (4) securing the right-hand cover.
Install a guide stud (G1) to prevent the cover from falling. Release and
remove the housing cover.
Installing
Clean the mating face of the housing and check the transfer pipe (25) is
in place. Install a new seal (39). Check the two locating pins (1) are
in place.
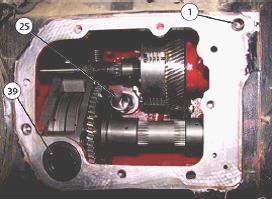
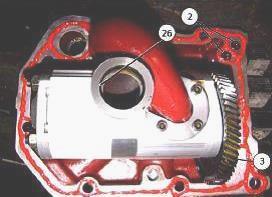
Clean the mating face of the right-hand cover, smear it with Loctite 510
or equivalent, and Install the new seals (39) (2) (3).
Install two guide pins (G1) to the housing, and Install the cover onto
(G1).
Place the cover on the housing and fit two diametrically opposing screws
(4).
Remove the guide pins (G1), and Install and tighten all screws (4) to a
torque of 72 - 96 Nm (Loctite 241). Connect the filtration switch (19)
connector.
Install the suction strainer (18) and the filtration switch protector.
Direct the discharge hole on the latter downwards.
Connect the electrical connectors on the solenoid valves according to
the marks made at disassembly. Connectthe hydraulic union (D).
Connect the hydraulic unions (A) (B) (C). Install the block (17).
Connect the hydraulic unions on the block (17).
If the MF 6160, 6170 tractor is equipped with a trailer braking system, Install the brake valve (18) and tighten the screws (19).
Connect the
hydraulic supply unions
of the hydraulic spool valves. Install the 15 micron filter (14) and its
base. Install the clogging indicator harness.
Reinstall the wheel, then tighten the nuts to the torque stated below.
Remove the axle stand, top up the oil level in the housing and check it
using the gauge located
to the rear of the centre housing.
Check the tightness of the mating faces and hydraulic unions. Wheel
tightening torque: 400-450 Nm
- The function of each solenoid valve is moulded on the outside face of
the hydraulic cover casting.
- The cover is fitted with three different types of solenoid valves.
- Out of the four or five solenoid valves fitted (depending on version),
the "Fluid Power System" solenoid valve (7) of the PTO clutch is of the
proportional type.
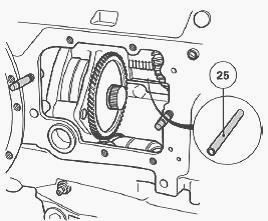
- The "Parker" solenoid valve (8) of the Massey Ferguson 6170, 6160 PTO
brake has a solenoid valve with a diode and is represented by the
following symbol.
- The body of the "Parker" solenoid valve (11) must be Installed to the
control circuit of the Hare / Tortoise mechanism. It features a machined
end-piece on one of
its ends. Take out the screws (4) and remove the cover.
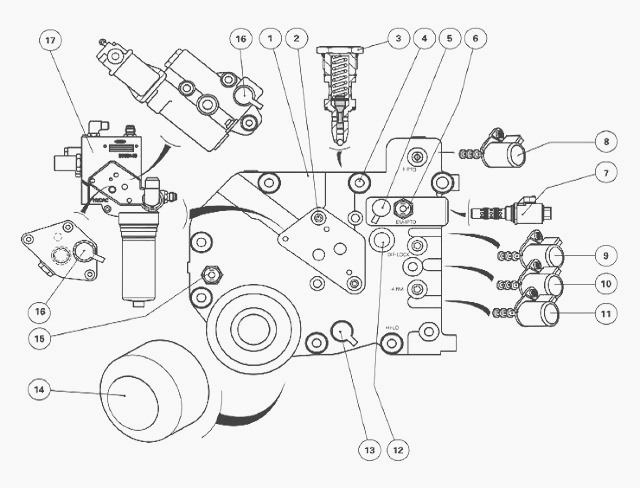
After removing the cover, if necessary remove from the housing the
transfer pipe (25), ensuring hydraulic continuity with the pump
manifold.
Installing
Clean the mating faces of the housing and the cover.
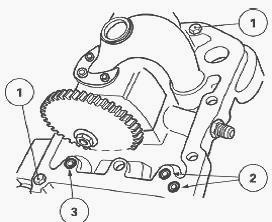
Check for the presence of the two locating pins (1) and rivets at the
ends of the channels on the cover. Install new seals:
- on the Hare / Tortoise channels (2)
- on the power take-off clutch channel (3).
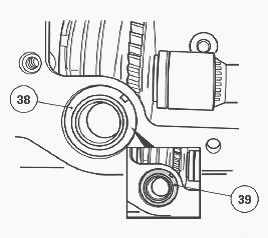
Install and position the suction pipe (38), with its notch along the
axis of the pin inserted in the housing. Put in place seal (39).
Screw two locally made guide pins into opposing holes on the housing.
Reinstall the transfer pipe if it was previously removed.
Smear the mating faces of the cover with a sealing product (Loctite 510
or equivalent) taking care not to block the hydraulic ports of the Hare
/ Tortoise mechanism.
Reinstall the cover. Take out the guide pins. Install and tighten the
screws (4) to a torque of 72 -96 Nm.
Reconnect (according to the markings made):
- solenoid valves
- filtration switch
- low pressure switch
- engine speed sensor.
Attach the electrical harnesses using a cable clip. Reconnect the pipes
and hose. Reinstall the valve (6) (if fitted).
Check the condition of the strainer seal (18) and lubricate it.
Reinstall the strainer and tighten it an additional quarter turn after
it contacts with the cover.
Reinstall the 15 micron filter and its base. Reconnect the filter
clogging indicator.
Lift the MF 6170, 6160 tractor. Reinstall the wheel. Remove the axle
stand and tighten the nuts to a torque of 400 - 450 Nm. Remove the
chocks.
Top up the transmission oil level of the rear axle and check it using
the gauge located to the rear of the centre housing.
Check the operation of the electrical circuits, the low pressure switch,
the solenoid valves, the filtration switch and the filter clogging
indicator.
If the pump has been replaced, or if the disassembly of one or several hydraulic component(s) was necessary, check the hydraulic circuit by carrying out the relevant tests. Check the tightness of the cover mating face, the strainer and the hydraulic unions.
________________________________________________________________________________
________________________________________________________________________________________
________________________________________________________________________________________
________________________________________________________________________________________
________________________________________________________________________________________
________________________________________________________________________________________
________________________________________________________________________________________
________________________________________________________________________________________
________________________________________________________________________________________
________________________________________________________________________________________
________________________________________________________________________________________
________________________________________________________________________________________
________________________________________________________________________________________
________________________________________________________________________________________
________________________________________________________________________________________
________________________________________________________________________________________
________________________________________________________________________________________
________________________________________________________________________________________
________________________________________________________________________________________
________________________________________________________________________________________
________________________________________________________________________________________

 SPECS
SPECS LOADERS
 MAINTENANCE
 PROBLEMS
 MF 1523
 MF 1531
 MF 135
 MF 1547
 MF 1635
 231
231 231S
231S 235
235 240
240 241
241 255
255 265
265 274
274 285
285 375
375 916X Loader
 921X Loader
 926X Loader
 931X Loader
 936X Loader
 941X Loader
 946X Loader
 951X Loader
 956X Loader
 988 Loader
 1655
1655 GS1705
 1742
1742 2635
2635 4608
4608 1080
1080 1100
1100 2615
2615 3050
3050 3060
3060 4708
4708 5455
5455 5450
5450 5610
5610 5613
5613 DL95 Loader
 DL100 Loader
 DL120 Loader
 DL125 Loader
 DL130 Loader
 DL135 Loader
 DL250 Loader
 DL260 Loader
 L90 Loader
 L100 Loader
 6499
6499 7480
7480 7618
7618 7726
7726 1533
1533 2604H
2604H 2607H
2607H 4455
4455 4610M
4610M 4710
4710 L105E Loader
 L210 Loader
 1014 Loader
 1016 Loader
 1462 Loader
 1525 Loader
 1530 Loader
 232 Loader
 838 Loader
 848 Loader
 5712SL
 6713
6713 6715S
6715S 7475
7475 7615
7615 7716
7716 7724
7724 8240
8240 8650
8650 8732
8732 246 Loader
 1036 Loader
 1038 Loader
 1080 Loader
 856 Loader