________________________________________________________________________________
Massey Ferguson 7620, 7622 Removing and install the cover plate and charge pump
Removing and install the left-hand cover
plate
Removal
Immobilise the MF 7620, 7622 tractor. Chock the right-hand rear wheel.
Chock between the frame and the front axle (optional).
Partially drain the housings.

Remove:
- the rear left-hand wheel and Install a safety stand underneath the
trumpet housing
- the fuel tank, having partially drained it beforehand.
Unscrew the strainer bowl (20). Remove the strainer (6).
Remove:
- screws (10) and (19);
- the nuts (28).
Release and remove the cover plate.
Reinstall
Clean the mating faces of the housing and cover plate.
Smear the mating face of the cover plate on the housing with Loctite
5206 or equivalent.
Replace the "O" ring providing the seal between the
charge pump and
charge pipe.
Fix the adhesive face of the flat seal to the suction manifold. Figurs
shows a flat seal adhered to a suction manifold for a Massey Ferguson
7622, 7620 GPA40 rear
axle.
Check:
- that the two locating pins are on the cover plate;
- that the GPA40 rear axle charge pipe is correctly positioned. The
charge pipe is fixed to the inside of the centre housing by a clip.
Screw two locally obtained guide studs into opposing holes on the centre
housing or the intermediate housing (depending on assembly).
Slide the cover plate (14) onto the two studs mentioned above, aligning the studs (7) with the relevant ports on the cover plate.
When the end
of the studs (7)
protrudes beyond the external face of the cover plate, gradually and
partially screw on the nuts (28).
Using a plastic hammer, strike the cover plate to move it towards the
housing.
Remove the locally obtained guide studs. Use the screws (10) and (19) to
definitively attach the cover plate to the housing.
Tighten opposing screws (10) and (19) to a torque of 90 - 120 Nm.
Unscrew the nuts (28). Lightly smear their thread with Loctite 242 or
equivalent. Lock them definitively at 15 - 20 Nm.
If necessary, replace the "O" ring (21) on the strainer bowl (20).
Position the strainer (6). Tighten the bowl to a torque of 15 - 20 Nm.
Reinstall the fuel tank and pour any drained fuel back in. Install the
wheel and tighten the screws or wheel nuts to the correct torque
depending on the version. Top
up the oil level in the housings.
Check it:
- for GPA20, using the gauge located to the right of the PTO housing;
- for GPA30, on the sight glass on the left-hand side of the centre
housing;
- for GPA40, using the sight glass located to the left of the PTO
housing;
Carry out a road test. Check the tightness of the mating face of the
cover plate and strainer bowl (20).
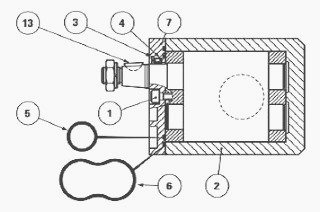
Removing and install the charge pump
Take off the cover plate.
Removal
If the gear is also to be removed, immobilize the gear and unscrew the
nut while the charge pump is on the cover plate.
Using a puller, release the gear (if required). Unscrew the screws and
remove the charge pump (2).
Reinstall
Clean the mating faces of the MF 7622, 7620 charge pump and cover plate.
Check the presence of the dowels.
Inside the cover plate, apply a bead C of Loctite 574 or equivalent around the two charge pump screw holes.
The diameter of the bead should
be small so as to not
touch the groove of seal. Install a new seal.
Install the key and the gear (if removed) onto the charge pump shaft.
Install the charge pump onto the locating pins.
Lightly smear the thread of the screws with Loctite 242 or equivalent.
Tighten these screws to a torque of 40-50 Nm.
If the gear was removed, lightly smear the thread of the nut with
Loctite 242 or equivalent.
Tighten this nut to a torque of 50 - 60 Nm.
Manually check the rotation of the charge pump. Install the cover plate.
Replacing the charge pump seals
Remove the Massey Ferguson 7620, 7622 cover plate and the charge pump.
Disassembly
Removal of the charge pump is identical irrespective of the type of rear
axle (GPA20, GPA30 or GPA40).
Moderately secure the charge pump in a vice Installed with protective
jaws.
Unscrew the screws (1) and remove the cover plate (7).
Remove:
- the circlip (3);
- the seal (4);
- the "O" rings (5) (6) on the cover plate (7).
Reassembly
Carefully fit the seal (4) using a suitable fixture. Lubricate its lip
(with miscible grease).
Install the circlip (3). Lightly smear the "O" rings (5) and (6) with miscible grease.
Position
these seals in the grooves of the cover plate (7).
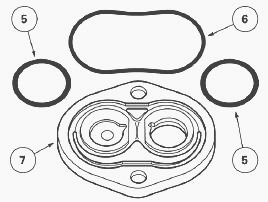
Correctly position the cover plate above the charge pump and then
Install the cover plate.
Tighten the screws (1) to a torque of 30 - 40
Nm.
Manually check the rotation of the charge pump. Install the charge pump and the left-hand cover plate.
________________________________________________________________________________
 SPECS
SPECS LOADERS
 MAINTENANCE
 PROBLEMS
________________________________________________________________________________________
 MF 1523
 MF 1531
 MF 135
 MF 1547
 MF 1635
________________________________________________________________________________________
 231
231 231S
231S 235
235 240
240 241
241________________________________________________________________________________________
 255
255 265
265 274
274 285
285 375
375________________________________________________________________________________________
________________________________________________________________________________________
 916X Loader
 921X Loader
 926X Loader
 931X Loader
 936X Loader
________________________________________________________________________________________
 941X Loader
 946X Loader
 951X Loader
 956X Loader
 988 Loader
________________________________________________________________________________________
 1655
1655 GS1705
 1742
1742 2635
2635 4608
4608________________________________________________________________________________________
 1080
1080 1100
1100 2615
2615 3050
3050 3060
3060________________________________________________________________________________________
 4708
4708 5455
5455 5450
5450 5610
5610 5613
5613________________________________________________________________________________________
 DL95 Loader
 DL100 Loader
 DL120 Loader
 DL125 Loader
 DL130 Loader
________________________________________________________________________________________
 DL135 Loader
 DL250 Loader
 DL260 Loader
 L90 Loader
 L100 Loader
________________________________________________________________________________________
 6499
6499 7480
7480 7618
7618 7726
7726 1533
1533________________________________________________________________________________________
 2604H
2604H 2607H
2607H 4455
4455 4610M
4610M 4710
4710________________________________________________________________________________________
 L105E Loader
 L210 Loader
 1014 Loader
 1016 Loader
 1462 Loader
________________________________________________________________________________________
 1525 Loader
 1530 Loader
 232 Loader
 838 Loader
 848 Loader
________________________________________________________________________________________
 5712SL
 6713
6713 6715S
6715S 7475
7475 7615
7615________________________________________________________________________________________
 7716
7716 7724
7724 8240
8240 8650
8650 8732
8732________________________________________________________________________________________
 246 Loader
 1036 Loader
 1038 Loader
 1080 Loader
 856 Loader